SuperCollider synthesis
Tutorial to make evolving drones in a musical programming language.
Note: cover image from https://www.ajournalofmusicalthings.com/fourth-annual-drone-music-day-today/
SuperCollider is a free platform for audio synthesis and algorithm composition. It really excels at real-time analysis, synthesis and processing and provides a framework for seamless combination of audio techniques like additive and subtractive synthesis. The following is a tutorial to learn how to make a drone in SuperCollider (e.g. Sunn O))))1)
Before you begin
Before starting, make sure you have SuperCollider and plugins (if you want).
- Install SuperCollider
- Install SuperCollider plugins (optional, but recommended)
If you have these basic things installed, you are good to go. Feel free to do a SuperCollider tutorial if you want, but I’ll assume you don’t know how to use it.
Five steps to get in the drone zone
We are going to make the drone I call “Dreamcrusher”, a primal sawtooth drone. We’ll get there from a simple sine wave, in just 5 simple steps.
Dreamcrusher (final version):
1. Tone
We’ll start with a basic tone and turn it into a drone.
First open SuperCollider and “boot the server” by selecting Server -> Boot Server from the menu.
Now paste the following code as the starting drone. this drone is simply a C3 sine wave (C2 = 131.81 hz).
Dreamcrusher (version 1)
Code (version 1)
(
x = SynthDef("basic",
    {
        arg hz=131.81, amp=0.5;
        var sig; // define variables we need

        // the drone zone!
        sig = SinOsc.ar(
            freq:hz,
            mul:amp,
        );

        // make two versions, one for left and one for right
        sig = sig.dup;

        // make sound!
        Out.ar(0,sig);
    }
).play;
)
To run this code, click your cursor anywhere in the code that you just pasted and press Ctl+<enter>. This runs all the code between the first and last parentheses. You should hear a very low sound (maybe use headphones to hear it!).
To stop it just press Ctl+<period>.
Another cool trick is that you can change things while its playing, for instance we can change the frequency and volume (use Ctl+Enter to run each line).
x.set("hz",65.41*2); // up can octave
x.set("amp",0.01); // volume down
The reason this works is that we defined the drone into the x variable and defined arguments (see the line “arg hz=65.41, amp=0.5;”).
2. Add overtones
Mow lets make it less boring with overtones. Overtones are multiples of fundamental at lower volumes. We can easily just repeat what we wrote before but wrap it inside a Mix.ar() function in an array (denoted by the brackets).
Dreamcrusher (version 2)
Code (version 2)
(
x = SynthDef("basic_w_overtones",
    {
        arg hz=131.81, amp=0.5;
        var sig;

        // the drone zone!
        sig = Mix.ar([
            SinOsc.ar(
                freq: hz,
                mul: amp,
            ),
            SinOsc.ar(
                freq: hz*2,
                mul: amp/2,
            ),
            SinOsc.ar(
                freq: hz*4,
                mul: amp/4,
            )
        ]);

        // spread the signal
        sig = Splay.ar(sig);

        // make sound!
        Out.ar(0,sig);
    }
).play;
)
I made sure to decrease the volume of each increasing frequency using by dividing the amp by a multiple of 2.
3. Different oscillators!
Sine waves are nice, but there are lots of different oscillators we can use. we can swap out SinOsc.ar (sine wave) for VarSaw (sawtooth), SinOscFB (sine w/ feedback), Pulse, or many others. Here I’ve opted for the saw wave:
Dreamcrusher (version 3)
Code (version 3)
(
x = SynthDef("basic_w_overtones_varsaw",
    {
        arg hz=131.81, amp=0.5;
        var sig;

        // the drone zone!
        sig = Mix.ar([
            VarSaw.ar(
                freq: hz,
                mul: amp,
            ),
            VarSaw.ar(
                freq: hz*2,
                mul: amp/2,
            ),
            VarSaw.ar(
                freq: hz*4,
                mul: amp/4,
            )
        ]);

        // spread the signal
        sig = Splay.ar(sig);

        // make sound!
        Out.ar(0,sig);
    }
).play;
)
Try other oscillators! See what happens.
4. Add modulation
Modulation will bring in organic wavering to the drone. There are many ways to do this, but my favorite is to use a randomly oscillating sine wave with a long period.
We can get randomness all sorts of different ways to get modulation.
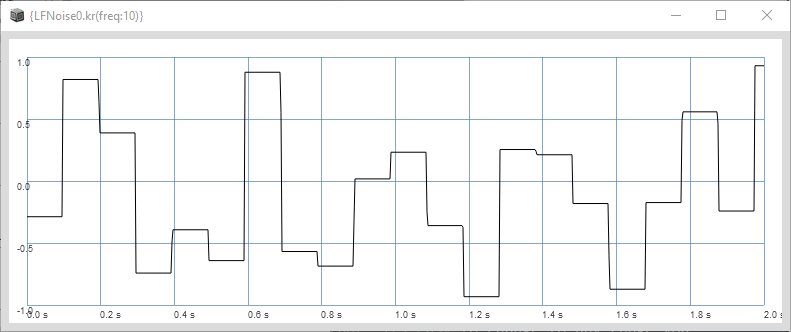
Stepped randomness
Using the LFnoise0.kr:
{LFNoise0.kr(freq:10)}.plot(1)
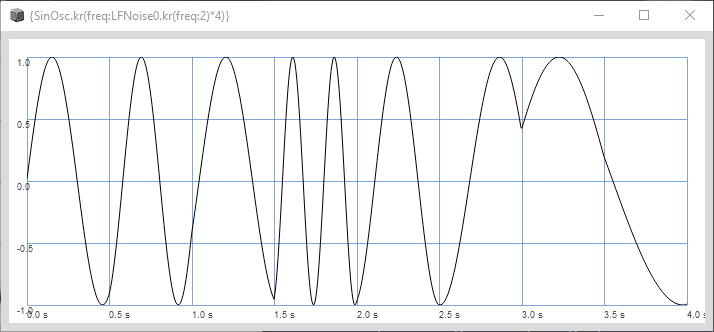
Oscillating randomness
Then we can make a sine wave which uses that stepped noise as its frequency:
{SinOsc.kr(freq:LFNoise0.kr(freq:2)*4)}.plot(4)
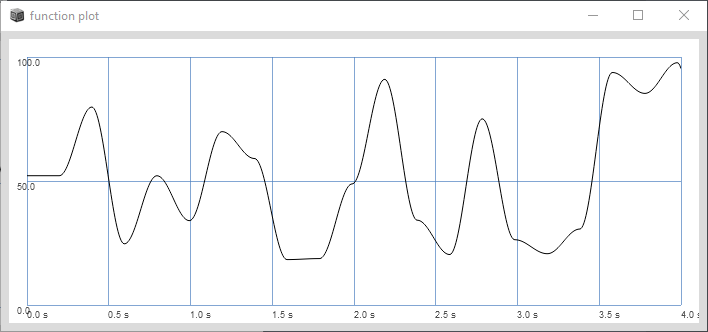
The sine wave naturally has values between -1 and 1, so we might need to change that. its easy to change to any range you want with the .range(min,max) function (or by using LinLin.kr). Here i can change it to 0-100:
{SinOsc.kr(freq:LFNoise0.kr(freq:1)).range(0,100)}.plot(4)
Drunken walk
You can dream up any sort of modulation that you like. another of my favorite modulation sources of is a nice “drunken walk” (best to replace both 5’s by the number you want):
{VarLag.kr(LFNoise0.kr(5).range(0,100),1/5,warp:\sine)}.plot(4)
You can easily swap in and out these modulations, just make sure to convert the .range(min,max) to the range you need it.
Now throw those into the drone to modulate the frequencies and the width (a parameter associated with the VarSaw ) of our oscillator:
Dreamcrusher (version 4)
Code (version 4)
(
x = SynthDef("basic_w_overtones_varsaw_modulation",
    {
        arg hz=131.81, amp=0.5;
        var sig;

        // the drone zone!
        sig = Mix.ar(
            VarSaw.ar(
                freq: Lag.kr(hz * SinOsc.kr(LFNoise0.kr(1)).range(0.99,1.01),1),
                width: SinOsc.kr(LFNoise0.kr(1)).range(0.4,0.6),
                mul: amp ,
            ) +
            VarSaw.ar(
                freq: Lag.kr(2*hz * SinOsc.kr(LFNoise0.kr(1)).range(0.99,1.01),1),
                width: SinOsc.kr(LFNoise0.kr(1)).range(0.4,0.6),
                mul: amp/2,
            ) +
            VarSaw.ar(
                freq: Lag.kr(4*hz * SinOsc.kr(LFNoise0.kr(1)).range(0.99,1.01),1),
                width: SinOsc.kr(LFNoise0.kr(1)).range(0.4,0.6),
                mul: amp/4,
            )
        );

        // spread the signal
        sig = Splay.ar(sig);

        // pan
        sig = Balance2.ar(sig[0] ,sig[1],SinOsc.kr(
            LFNoise0.kr(0.1).range(0.05,0.2)
        )*0.1);

        // make sound!
        Out.ar(0,sig);
    }
).play;
)
Also note, at the end I threw in more modulation in the stereo field - by modulating the pan of the signal with the Balance2 function which handles panning of the signal.
Getting to be pretty drone-like!
5. Add filter + effects
Filters and effects go a long way. There are lots of filters available: BPF (band pass), LPF (low pass), MoogFF (Moog VCF), HPF (high pass), to name a few. there are also some nice effects available like FreeVerb and Greyhole (extensions needed for latter).
You can cruise the documentation and the examples in the documentation to get little snippets that you can easily reuse. The final drone iteration, which I call “Dreamcrusher” came out by looking at the LocalOut docs and pulling a little feedback example and inserting it, along with feedback into the drone above. Of course I added the drunken walk type modulation to both. And voila! We are drone.
Drone (final version)
Code (final version)
(
x = SynthDef("dreamcrusher",
    {
        arg hz=131.81, amp=0.5;
        var local, ampcheck, sig;

        // the oscillator part
        sig = Mix.ar(
            VarSaw.ar(
                freq: Lag.kr(hz * SinOsc.kr(LFNoise0.kr(1)).range(0.99,1.01),1),
                width: SinOsc.kr(LFNoise0.kr(1)).range(0.4,0.6),
                mul: amp,
            ) +
            VarSaw.ar(
                freq: Lag.kr(2*hz * SinOsc.kr(LFNoise0.kr(1)).range(0.99,1.01),1),
                width: SinOsc.kr(LFNoise0.kr(1)).range(0.4,0.6),
                mul: amp/2,
            ) +
            VarSaw.ar(
                freq: Lag.kr(4*hz * SinOsc.kr(LFNoise0.kr(1)).range(0.99,1.01),1),
                width: SinOsc.kr(LFNoise0.kr(1)).range(0.4,0.6),
                mul: amp/4,
            )
        );

        // spread the signal
        sig = Splay.ar(sig);

        // pan
        sig = Balance2.ar(sig[0] ,sig[1],SinOsc.kr(
            LFNoise0.kr(0.1).range(0.05,0.5)
        )*0.1);

        // feedback directly taken from the docs
        // https://depts.washington.edu/dxscdoc/Help/Classes/LocalOut.html
        ampcheck = Amplitude.kr(sig);
        sig = sig * (ampcheck > 0.02); // noise gate
        local = LocalIn.ar(2);
        local = OnePole.ar(local, 0.4);
        local = OnePole.ar(local, -0.08);
        local = Rotate2.ar(local[0], local[1],0.2);
        local = DelayN.ar(local, 0.3,
            VarLag.kr(LFNoise0.kr(0.1).range(0.15,0.3),1/0.1,warp:\sine)
        );
        local = LeakDC.ar(local);
        sig = ((local + sig) * 1.25).softclip;

        // filter with drunken walk modulation
        sig = LPF.ar(sig,
            VarLag.kr(LFNoise0.kr(0.3).range(ArrayMin.kr([hz,80]),16000),1/0.3,warp:\sine)
        );

        // feedback
        LocalOut.ar(sig*
            VarLag.kr(LFNoise0.kr(2).range(0.9,1.2),1/2,warp:\sine)
        );

        // panning
        sig = Balance2.ar(sig[0] * 0.2,sig[1]*0.2,SinOsc.kr(
            LFNoise0.kr(0.1).range(0.05,0.2)
        )*0.1)*amp;

        // send it out
        Out.ar(0,sig);
    }
).play;
)
Another trick when adding something is to use your mouse to play with parameters. Simply change one of the parameters to MouseX.kr or MouseY.kr and moving your mouse will change that parameter.
From here you can experiment with replacing bits and pieces with different oscillators/filters/effects, or replacing your Mouse parts with different sorts of modulations. for instance, you can replace the filter with a MoogLadder with random modulation in the filter and resonance:
// add filter
sig = MoogLadder.ar(sig,
        VarLag.kr(LFNoise0.kr(5).range(80,2000),1/5,warp:\sine),
        VarLag.kr(LFNoise0.kr(5).range(0,1.0),1/5,warp:\sine)
);
There are endless variations and permutations. Drone on!